Simple Knit Cowl for Beginners: A Chunky One-Skein Project
Make a chunky garter-stitch cowl from one large skein of bulky yarn. You knit a flat rectangle on US 10.5 needles and seam the short ends into a loop, with an optional seed stitch version.

Tutorial at a glance
Materials
- About 120 yd bulky yarn (one large skein)
- US 10.5 (6.5 mm) needles
- Large-eye tapestry needle
- Scissors
- Tape measure
A simple knit cowl is one of the most satisfying things to make when you are new to knitting: a thick rectangle of garter stitch, sewn into a loop, from a single large skein of bulky yarn. If you can cast on, knit and bind off, you already have every skill it asks for.
Thick yarn on large needles grows quickly, so you see progress after only a few rows. The finished cowl is about 10 inches (25 cm) tall and about 26 inches (66 cm) around, which sits close to the neck in a single loop and tucks neatly inside a coat collar.
Materials
- Bulky (#5) yarn, about 120 yards. That is one large skein of many bulky yarns, but check the yardage on the label, because skeins vary.
- US 10.5 (6.5 mm) knitting needles, straight or circular used flat.
- A tapestry needle with an eye large enough for bulky yarn.
- Scissors and a tape measure.
Pick a smooth yarn in a light or medium color so you can see each stitch. A wool or wool blend is warm and forgiving; a soft acrylic is easy to wash. Very fuzzy yarn hides your stitches and is hard to pull out if you need to fix something. The guide to the best yarn for beginner knitters explains what to look for on the label, and there are more cold-weather ideas in winter knitting projects for beginners.
Size and gauge
You knit a flat rectangle and join its two short ends. The width of your knitting becomes the height of the cowl, and the length becomes the distance around your neck.
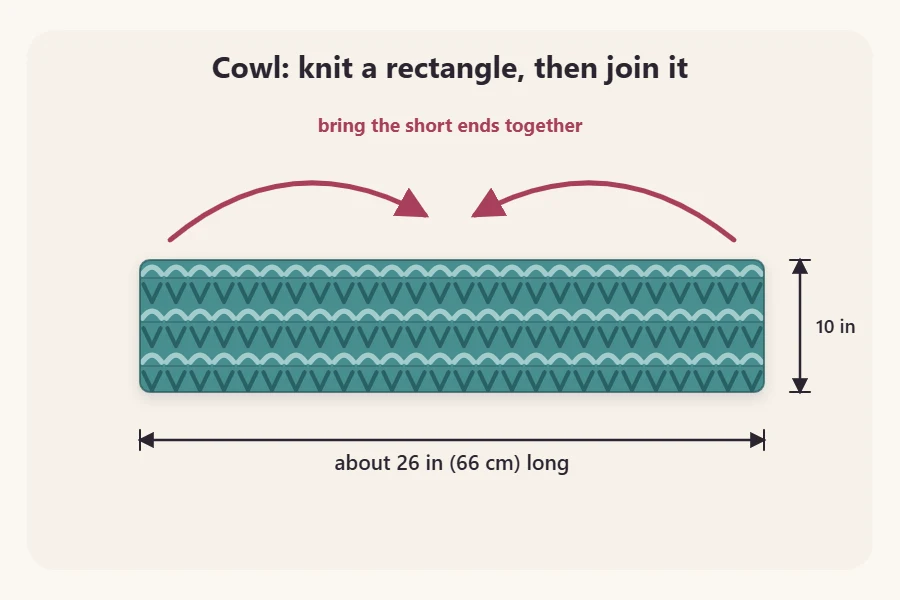
Gauge, the number of stitches in a given width, works out to roughly 13 stitches over 4 inches (10 cm) in garter stitch for this project. It does not need to be exact, since a cowl that is slightly wider or narrower still fits. Gauge does affect how far your yarn goes, though: loose knitting makes a bigger fabric and uses more yarn. If you would like to check before you start, see how to measure a gauge swatch.
Abbreviations
- CO: cast on
- k: knit
- p: purl (only needed for the seed stitch variation)
- st(s): stitch(es)
- rep: repeat
- BO: bind off
The cowl pattern
- CO 32 sts. Bulky yarn uses more tail per stitch than thinner yarn, so for a long-tail cast-on allow roughly 1.5 inches per stitch plus 6 inches extra, about 55 inches in all. Cast on loosely enough that the stitches slide along the needle.
- Knit every stitch of every row. This is garter stitch, and it looks the same on both sides.
- Continue until the piece measures about 26 inches (66 cm) from the cast-on edge, laid flat and not stretched.
- BO loosely. Cut the yarn, leaving a tail of about 30 inches for seaming, and pull it through the last loop.
In garter stitch, two rows make one ridge. Counting ridges is the easiest way to keep track of how far you have come, and it helps you make a second cowl the same length as the first.
Watch out
Do not knit until the yarn runs out. The bind-off row and the seam together need roughly 2 yards. If your skein is running short before 26 inches, stop a little early; a cowl that is an inch shorter still fits.
Seaming the cowl into a loop
- Lay the rectangle flat and bring the cast-on edge up to meet the bind-off edge. Make sure the strip is not twisted.
- Thread the long tail onto the tapestry needle.
- Starting at the corner where the tail hangs, pass the needle through one edge stitch on the cast-on side and the stitch directly opposite it on the bind-off side.
- Pull the yarn through until the two edges touch. Keep the seam about as relaxed as the knitting itself, so it stays as stretchy as the rest of the fabric.
- Repeat stitch by stitch across all 32 stitches, then fasten off by running the needle under the last seam stitch twice.

Weave the remaining tails into the fabric for about 2 inches, changing direction once. Garter stitch is reversible, so choose whichever face of the seam looks less tidy and call that the inside. Bulky tails are thick, so follow the path of the ridges to hide them. There is a step-by-step guide in how to weave in ends.
Seed stitch variation
If you can purl, seed stitch gives the same cowl a pebbly texture. Like garter stitch, it lies flat and looks good on both sides. Cast on the same 32 stitches and work these two rows instead of knitting every row:
- Row 1: *k1, p1; rep from * to end.
- Row 2: *p1, k1; rep from * to end.
The asterisk marks the group of stitches that you repeat across the row. On every row you purl the stitches that look like knits and knit the stitches that look like purls, which is what breaks the fabric into little bumps instead of columns. Bring the yarn between the needle tips each time you switch, to the front before a purl and to the back before a knit. The seed stitch tutorial shows how to read the stitches so you never lose your place.
Your gauge in seed stitch may differ a little from your garter gauge, so keep an eye on how much yarn is left as you approach the final few inches.
Small fixes for common problems
- The piece is getting wider: count your stitches. More than 32 usually means an accidental yarn over or a stitch knitted into the strand between two stitches.
- The edges look loose: give the working yarn a gentle tug after the first stitch of each row.
- The bind-off edge is tighter than the cast-on edge: undo it and bind off again with a needle one or two sizes larger in your right hand.
- The skein has a knot: cut it out and rejoin the yarn at the start of a row, leaving 6-inch tails to weave in.
Tip
Before seaming, wrap the rectangle around your neck and pinch the ends together. If you would like a roomier fit and have yarn to spare, knit a few more ridges first.
Frequently asked questions
Do I need circular needles to knit a cowl?
Not for this one. Many cowls are knit in the round on a circular needle, but this version is a flat rectangle worked back and forth on any needles you like, then sewn into a loop. That keeps the project within reach if you have only learned to knit flat.
What if my skein has less than 120 yards?
Buy a second skein from the same dye lot, or make the cowl a little narrower by casting on fewer stitches, which makes it shorter from chin to collarbone. Either way, save roughly 2 yards for binding off and seaming rather than knitting until the yarn runs out.
Can I make the cowl long enough to wrap twice?
Yes. Keep the same 32 stitches and knit the rectangle to roughly twice the length before seaming. Expect to need about twice the yarn, so buy both skeins together and check that the dye lot numbers on the labels match.

